
· 2 min read
Khanate L.

คำถาม

  • คุณรู้หรือไมว่า API ของคุณมีใครเรียกใช้งานอยู่บาง
  • คุณรู้หรือไมว่า API ที่คุณเรียกใช้งานอยู่มีการ update บ่อยแค่ไหน แล้วทุกครั้งที่มีการเปลี่ยนแปลงได้แจ้งคุณทุกครั้งหรือเปล่า
  • เวลาที่ต้อง Intergrate หรือ End-to-End Test คุณมักเจอปัญหาและเสียเวลาเยอะหรือไม

ถ้าคุณเจอปัญหาเหล่านี้ ผมคิดว่า Contract Testing พอจะช่วยคุณได้

Contract Test vs End-to-End Test

Contract Test นั้นไม่ใช่ End-to-End(E2E) Test นะ Contract Test เนี่ยจะกินแรงและเวลา น้อยกว่า E2E Test ในระยะยาวเอามากๆ

pactflow.io contract testing

จากรูปจะเห็นว่า Contract test จะกินเวลาและกำลังคนแค่ช่วงแรกแต่หลังจากนั้นจะนั้นถึงแม้ว่า feature จะเพิ่มมากขึ้นก็จะไม่กินเวลาเพิ่มกว่าเดิมเท่าไหร่ กลับกันใน E2E test เริ่มแรกจะใช้เวลาและกำลังคนนิดเดียว แต่พอ feature มากขึ้นเรื่อยๆ แล้วก็จะกินทั้งเวลาและกำลังคนมากขึ้นกว่าเดิมมากๆ

Contract test มันคือยังไง

หลักการของ contract test คือจะเป็นคนกลางที่ตรวจสอบการทำงานระหว่าง consumer และ provider แล้วบอกผลลัพธ์มาให้ว่าตรงตามสัญญา(contract) ที่ให้ไวหรือเปล่า

  • consumer ก็คือคนเรียกใช้งาน มองว่ามันเป็น Frontend อาจจะ web/mobile ที่ต้องใช้ API ก็ได้ครับ
  • provider ก็คือผู้ให้บริการ ให้มองว่ามันคือ Backend ที่ provide API ให้ Frontend เรียกนั้นละครับ
  • contract ก็คือ spec ของ API ที่ Backend ทำไวให้ Frontend เรียกนั้นเองครับ

ส่วนใหญ่ปัญหาระหว่าง Frontend กับ Backend มันก็คือเรื่อง Spec นี้ละ เพราะถ้า Frontend ทำไวแบบนี้แล้วเกิด Backend response กลับมาไม่ตรงตาม Spec หรือผิดแปลกไปจากเดิมก็ตูม💥ครับ

แล้วเราจะรู้ได้ยังไงละว่าการเปลี่ยนแปลงนี้มันสงผลกระทบอะไรบาง เราก็ต้อง Intergrate หรือ E2E Test นั้นละ ไม่งั้นจะรู้ได้ไงว่ามันโดนอะไรบาง ถ้าระบบเล็กๆ ก็คงไม่เท่าเพราะ Business ยังไม่มาก Dependency ก็ยังไม่เยอะ แต่ถ้าระบบใหญ่ๆ ละจะให้มา E2E กันบ่อยๆ ก็เปลืองคนเปลืองเวลาน่าดู ทุกครั้งที่มีเปลี่ยนแปลงก็ต้องมา E2E กันใหม่

เราสามารถนำ Contract test มาช่วยได้ครับ

เพราะจริงๆ แล้ว Contract test มันก็คือการทำ system ขึ้นมาเพื่อทดสอบว่าการทำงานระหว่าง Frontend และ Backend ที่ integrate กันผ่าน API แต่ละตัวเนี่ย Response มาตรงตาม Spec ที่คุยกันไหวหรือเปล่า ถ้าไม่ตรงตาม Spec เราก็จะได้ error กลับมาเราก็จะรู้ได้ก่อน

รูปด้านล่างนี้อธิบายรายละเอียดของ Contract test ได้ดีมากครับ

link ต้นทางเป็น animation ด้วยนะครับ แนะนำครับ https://pactflow.io/how-pact-works/#slide-1

pactflow.io contract testing

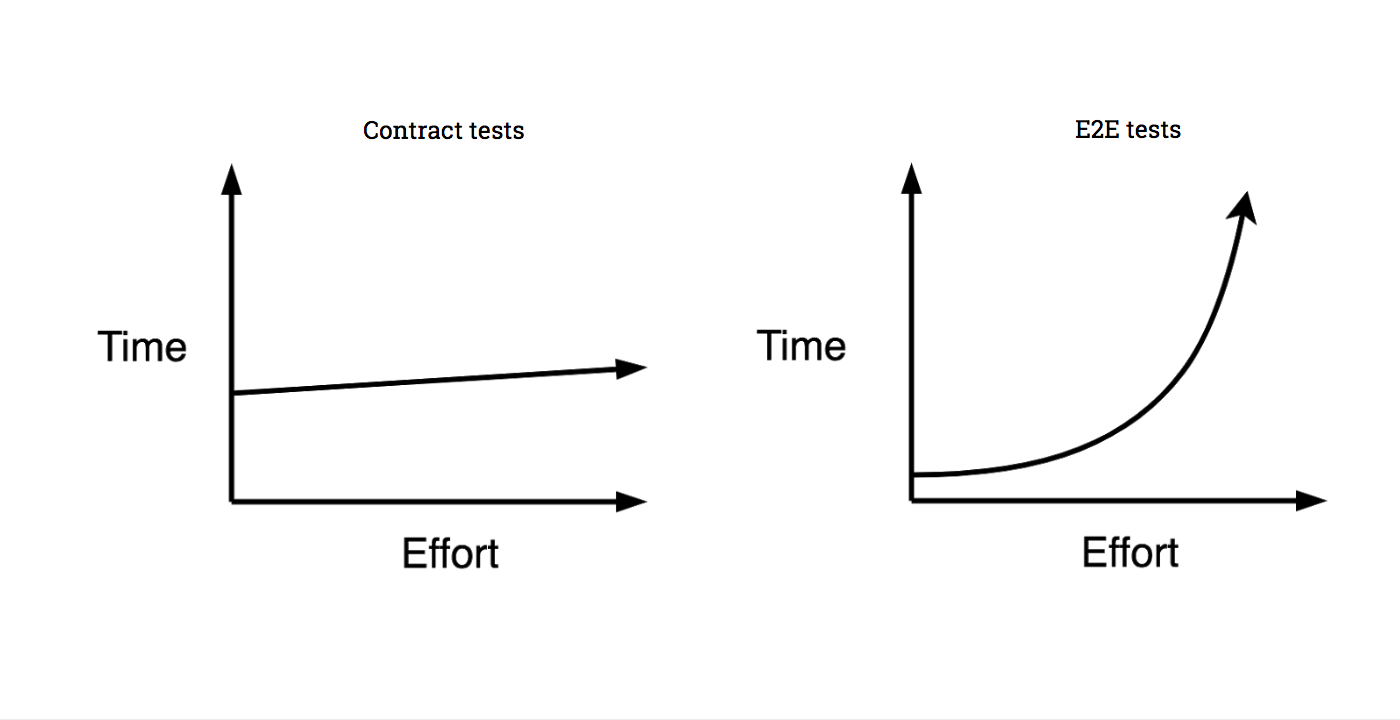
Contract test ควรใช้คู่กับ Unit test ของแต่ละ party นะครับ จะได้ผลลัพธ์ที่ดีที่สุด และแน่นอนว่า E2E test ก็ยังคงมีความจำเป็นอยู่นะครับ แต่บางครั้งเราสามารถใช้ Contract test เข้ามาช่วยเพื่อลดงานลงไม่ต้องถึงขั้นทำ E2E ทุกครั้งไปได้ครับ

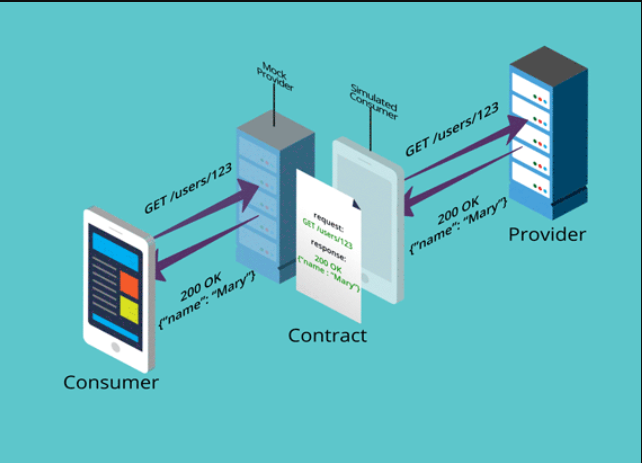
ครั้งต่อไปจะลองทำ contract test ง่ายๆ แต่ให้เห็นภาพให้อ่านกันครับ

ขอบคุณครับ

Reference


info

ลองดูตัวอย่างง่ายๆ กันเลยครับ 👉 Prism End-to-End Contract Testing

· 2 min read
Khanate L.

Tech stack ที่ควรรู้มีอะไรบางนะ

จากตอนที่แล้วที่เราเล่าถึงใน Part Non-Tech ไปแล้ว กลับไปอ่านกันได้ที่ App Food Delivery ต้องมีอะไรบางนะ

ในส่วนของบนความนี้ก็จะลงในส่วนของ Tech กันครับ ก็มี Web development ทั้ง Front-end/Back-end Programming Language และ Database

เริ่มด้วย Front-end ทั้ง Web และ Application

  1. Web Front-end (Backoffice, Restaurant) - สำหรับระบบหลังบ้านและร้านค้า ยุคนี้แล้วแนะนำว่าควรเป็น web ครับ ง่ายต่อการ maintain tech stack ก็แนะนำดังนี้
    1. js, ts - แน่นอนยุคนี้ js แถบจะไม่มีใครไม่รู้จักครับ เร็วและดี เจ้าดังๆ ก็ตามด้านล่าง
      • react
      • vue
      • angular
    2. python
    3. php
  2. App (User, Delivery, Restaurant) - สำหรับ ลูกค้า, คนส่งของ, ร้านค้า นอกจากควรเป็น mobile native app ครับ เพราะต้องใช้ ข้อมูลบางอย่างจากมือถือลูกค้าด้วย เช่นพวก geo(lat, lng) tech stack ดังนี้เลย
    1. android - แน่นอน ก็ต้อง kotlin ครับ google ยังแนะนำให้ใช้ แต่ java ก็ยังได้อยู่
      • kotlin
      • java
    2. ios - ก็ต้อง swift ละครับตัวเลือกเดียว objective-c คงไม่มีคนใช้แล้ว(มั้ง)
      • swift
    3. android/ios - หรืออีกตัวเลือกที่ค่อนข้างมาแรง แต่ learning-curve ก็ไม่ธรรมดา
      • react-native
      • flutter

ตามด้วย Back-end

  1. back-end
    • golang
    • node.js
    • .net core
    • python
  2. database - แน่นอนยุคนี้ ไม่มีแล้ว 1 platform 1 DBเราต้องเลือก DBให้เหมาะกับงาน
    1. RDBMS(payment transaction) - เก็บข้อมูล transaction ต่างๆ ที่ต้องมี relation เยอะๆ order, payment
      • MariaDB
      • MsSQL
      • oracle
      • PostgreSQL
    2. N-RDBMS (chat, tracking) - เก็บข้อมูลที่มีโอกาส change structure บ่อยแน่นๆ และไม่ต้องการ relation เท่าไหร
      • MongoDB
      • ElasticSearch
      • Firebase
    3. cache (content) - เก็บข้อมูลชั่วคราวที่ไม่ได้เปลี่ยนบ่อย กัน load เยอะๆ
      • Redis

อื่นๆ ที่ควรรู้

เป็น Feature ที่จำเป็นและจะเพิ่มความสามารถให้ Platform

  1. social media API - แน่นอน API social เจ้าดังๆ เอามาใช้ให้คุมค่า พวกนี้บางเรื่อง free ด้วยนะ
    • Facebook
    • line
    • google
  2. payment gateway - เพื่อเป็นช่องทางให้ลูกค้า เยอะๆ เพื่อไม่ต้องให้ลูกค้ามาสมัครโน้นนี่ใหม่ ยิ่งเยอะ ก็ยิ่งดี แต่คงต้องศึกษา fee ดีๆ
    • PayPal
    • 2c2p
    • Pay solution
    • Omise
    • Bank
  3. Map - เราต้องการระบบ tracking ของคนส่ง ยังไงก็ขาดไม่ได้เลยเรื่อง map นอกจาก google map ก็มีหลายเจ้านะ
    • OsmAnd
    • OpenLayers
    • TomTom
    • Mapbox
    • Here
  4. Push Noti - แจ้งเตือน ก็ต้อง Push Noti เลย ยุคนี้จะ SMS( เสีย cost ) email ก็ไม่ได้สะดวกเรื่องแจ้งเตือนนิดๆ หน่อย
    • FCM
    • OneSignal
  5. Realtime - app ควร realtime เห็นภาพง่ายๆ ก็เรื่อง chat แต่อื่นๆ ก็นำมาใช้ได้ด้วย
    • Socket.io
    • SignelR
  6. Monitor - แน่นอน ถ้าคนใช้เยอะขึ้นมาก็ต้องมีระบบที่หาปัญหาได้ไว ดังนั้น ควรจะต้องมีระบบ monitor
    • Grafana
    • New Relic
    • Kibana
  7. nice to have - มีหรือไม่มีก็ได้ แต่ถ้ามีบางอย่าง ก็ทำให้ชีวิตง่ายขึ้น อย่าง CI/CD หรือ docker
    • docker
    • message queue
    • CI/CD

Reference

· 2 min read
Khanate L.

Business model มันเป็นยังไงนะ

องค์ประกอบ

เรามาเริ่มกันด้วย Part Business ดีกว่า ดังนั้นหัวข้อนี้ผมจะแบ่งเป็น 2 Part นะครับเริ่มจาก Non-Tech และ Tech

App Food Delivery มองภาพรวมเราสามารถแบ่งออกได้เป็น 3 ส่วนใหญ่ๆ ตามนี้เลยครับ

  1. Platform Owner

    ส่วนนี้คือเจ้าของระบบเลยครับ

  2. Restaurant Owner

    ส่วนนี้คือร้านค้าที่เราจะไป Deal ด้วยครับ แน่นอนยิ่งมายิ่งดี

  3. Delivery Professionals

    ผู้ที่ทำหน้าที่ให้ระบบสมบูรณ์ครับ นั้นคือผู้ส่งอาหาร ในส่วนนี้ประเทศไทยเราก็มีเยอะมากขึ้นแล้วตั้งแต่มี COVID-91 ขึ้นมา

ภาพนี้เป็นภาพ Overview ระบบ Food devlivery ได้ดีมากๆ ขอยืมมาใช้เลย

Create Your Own Seamless: Food Delivery App Features

อธิบายจากรูปแบบง่ายๆ เลย

  1. ลูกค้าเปิด App เพื่อสั่ง Order
  2. ค้นหาร้านที่ชอบหรืออาหารที่ชอบ
  3. เลือกสินค้าและยืนยัน Order
  4. จ่ายเงินผ่าน Payment Gateway (ตรงส่วนนี้ละ Platform onwer จะได้กำไรจากค่าอาหารและ COD(Cash On Delivery))
  5. Platform onwer ประสานงานกับร้านอาหารและจ่ายเงิน
  6. ร้านอาหารดำเนินการผลิต
  7. ร้านอาหารหาผู้รับส่งของ
  8. จัดส่งสินค้า
  9. ผู้สั่งรับของสินสุดรายการ

Feature หลักที่ขาดไม่ได้เลย

  1. เพื่อให้ง่ายแก่ลูกค้าต้องค้นหาง่าย ไม่ว่าจะด้วย search(ชื่อร้าน, สถานที่) , หรือใกล้เรา(map)
  2. ลูกค้าต้องสั่งซื้อง่าย และซื้อรายการเดิมที่ชอบได้ง่าย
  3. ต้องมีระบบแจ้งเตือนลูกค้าผ่าน push notification
  4. ต้องมีระบบ rating หรือ review ลูกค้าได้ เพื่อให้เกิด
  5. ลูกค้าควร chat คุยกับ ร้านค้า หรือคนส่งของได้

Web/Application ที่ควรมี

  1. Web Admin Dashboard
    • เราเป็น platform คนกลาง ต้องมีระบบดูแลทั้งหมดเพื่อให้ง่ายต่อการ config, tracking, support
  2. Restaurants App ( ร้านค้าก็ควรมี เพื่อให้ลดงานที่่คนเราต้องมาค่อยจัดการเอง ให้คนของร้านมาจัดการเองดีที่สุด feature หลักๆ ที่ควรมีก็ดังนี้ )
    • Easy to register ร้านต้องมาลงทะเบียบกับเราง่าย
    • Content management system ต้องมีระบบให้ร้านจัดการ content ของตัวเองว่าขายอะไรยังไงบาง
    • Promotion/Discount/Coupon มีระบบให้ร้านค้าได้เล่นกับลูกค้า
    • Find Deliver มีตัวช่วยให้ร้านค้าหาคนส่งของ
    • Tracking Order status มีระบบ tracking ว่าของถึงหรือยัง จ่ายเงินหรือยัง
  3. Mobile For Delivery Professionals ( คนส่งของ ก็ต้องมี feature หลักๆ ที่ควรมีก็ดังนี้ )
    • Information Navigator แนะนำเส้นทาง
    • Route ระบบนำทาง เพื่อให้แน่ใจว่าไปถูกแน่นอน
    • Start/End Order ต้องกำหนด status ของ order ได้ ไม่งั้นร้านจะไม่รู้
    • User/Restaurant Information
  4. Mobile User Application ( ลูกค้า ก็ต้องมี feature หลักๆ ที่ควรมีก็ดังนี้ )
    • Easy Login(Social Media Integration) แน่นอนต้อง ลงทะเบียนใช้ง่าย ตาม social ดังๆ ที่มีเลย
    • Multiple Payment Option ต้องลองรับจ่ายเงิน online หลายๆ ช่องทาง เดียวนี้มี payment e-wallet ผุดมากมาย
    • Push Notification ต้องมีแจ้งเตือน ไม่ว่าจะร้านส่งให้ คนส่งของกำลังไป หรืออื่นๆ
    • Call Driver ต้องโทรคุยกับของส่งได้ แน่นอนบ้านเราถนนเข้าใจง่ายที่ไหน
    • Track Driver ต้องรู้ว่าคนส่งอยู่ไหนแล้ว จะได้กำหนดชีวิตถูกเนอะ เผื่ออยากจะเข้าห้องน้ำก่อนไรงี้
    • Ratings/Review ให้ลูกค้าช่วยเป็นคนบอกหน่อยว่าร้านไหนดีร้านไหนไม่ดี ยุคนี้มันต้อง UGC (User Generated Content)
    • Chats นอกจากโทรแล้วก็ต้องมี chat ไม่ว่าจะคุยกับร้านหรือคนส่ง

Nice to Have (สิ่งที่ควรมีเพื่อให้ app เราน่าใช้)

  1. Real-time availability
    • ทุกอย่างควรจะเป็น real-time สั่งซื้อ tracking order
  2. Beautiful and Interactive (UX/UI)
    • หน้าตาสำคัญกว่า feature เทพๆ บาง feature ซะอีก ดังนั้นต้องใช้งานง่าย ไม่ต้องจับมือสอน และต้องสวยใสทันสมัย
  3. Promotion/Discount/Coupon/Reward/Loyalty
    • นอกจากร้านจะมี promotion โน้นนี้แล้ว ถ้าเจ้าของ app ทำให้ platform มีลูกเล่นกับลูกค้าได้ด้วย คนก็จะยิ่งมา ร้านก็จะยิ่งมา

Reference

· 3 min read
Khanate L.

อยากจะเล่าประสบการ์ณส่วนตัวที่พอเห็นมา เรื่องตำแหน่งของ SA ในช่วงที่เป็นยุคทองของ Dev ยุคนี้

เริ่มจาก SA ชื่อเต็มๆ คือ System Analyst ตำแหน่งนี้ทำอะไรเล่าแบบที่ไม่ยาวจนเกินไปก็...หลายคนจะบอกว่าเป็นนักวิเคราะห์ระบบ(ก็ตามชื่อมัน) แต่จริงๆ แล้วค่อนข้างทำหลายอย่างทีเดียวตั้งแต่

  • Gathering requirements
  • System design
  • Database design
  • Software document

Skill หลักๆ ที่กล่าวมาจะไม่ได้เน้น coding สักเท่าไหร แต่ๆๆๆ ควรจะผ่านงาน coding มาก่อนนะ ซึ่งถ้าใครเคย Search google เรื่อง SA แล้วมีคนถามเกี่ยวกับ SA ต้อง coding ได้ไม ต้องเป็น Dev มาก่อนไม โดนส่วนด้วยผู้เขียนก็ยังคิดว่าควรจะเป็น Dev มาก่อน แล้วก็ควรจะยังพอ Dev ได้ใน Tech Stack ที่ตัวเองดูแลนะ \ Activities อื่นๆ ที่ SA ต้องเข้าไป Involve ด้วยอีกก็ เช่น meeting, investigate, impact analysis, ...... อาจจะมีถึง project tracking เลยทีเดียว

ผมทำรูปคราวๆ มาให้ดูเพื่อให้เห็นชัดๆ ของ Skill SA 2 สาย SA+Dev และ SA+BA ตามประสบการ์ณผมนั้นเป็นยังไง

sa skill

สรุปคราวๆ เป็น Role ที่ค่อนข้างจะจับฉ่าย ในด้าน Tech เลยละ\ ด้วนคุณสมบัติตามที่กล่าวมาหากใครที่เติมโตมาจากสาย Dev แล้วเสริมทักษะ Soft skill กับการทำ document + infra เข้าไปมันก็จะได้เป็น Full Stack Dev แล้วละ\ ทำให้ในช่วง 1-2 ปีที่ผ่านมานี้ ตัวผู้เขียนรู้สึกว่าตำแหน่ง SA นี้ค่อยๆ มีความต้องการลดลง(ไม่รู้เป็นคนเดียวหรือเปล่า)คือตั้งแต่เข้าสู่ยุคของ Tech Startup แบบหนักๆ ความต้องการของ Dev ที่เป็น Full Stack ก็มีมากขึ้นอย่างเห็นได้ชัดเนื่องจากรับคนเดียวก็เพียงพอที่จะทำหน้านี้ cover ทั้งหมด เลยไม่มีความจำเป็นที่ต้องมี SA ก็ได้ และ Tech Startup เริ่มแรกเหมาะกับการทำอะไร Lean ที่สุดเพื่อความคร่องตัว document ไม่ต้องเป๊ะเพราะส่วนใหญ่จะทำ Product innovation ก็ยิ่งเข้าทาง Senior Dev ที่เพิ่ม Soft skill เลย

SA ยังจำเป็นอยู่ไม

คิดว่ายังมีความจำเป็นอยู่ขึ้นอยู่กับรูปแบบการทำงานขององค์กรนั้นๆ นะ ตำแหน่งหน้าที่ก็จะต่างกัน

  • Agile(Scrum)
    • สมาชิกเป็น Senior Dev ทั้งหมด
      • แบบนี้คิดว่าไม่จำเป็นที่จะต้องมี SA ก็ได้ คงต้องดูบริบทของงานแต่ละคนขององค์กรนั้นๆ อีกที
    • สมาชิกเป็น Senior Dev และ Junior Dev
      • แบบนี้แนะนำให้ควรมี SA อยู่ด้วย เนื่องจาก Senior ที่ต้องมาดูแลน้องในทีมด้วยถือเป็นหน้าที่หนักพอด้วย หากต้องดูในเรื่องอื่นๆ เพิ่มด้วยจะส่งผลกับการออก Feature ได้
  • Water fall(Non Agile)
    • แบบนี้คิดว่ายังไงก็ยังควรต้องมีอยู่ เพราะกระบวนการและ process ยังเยอะอยู่ มีช่วงเวลาในการเก็บ requirement ค่อนข้างยาวไม่ควรต้องให้ทีม Dev เข้ามา join ตรงนี้เพราะจะ manday ไป free

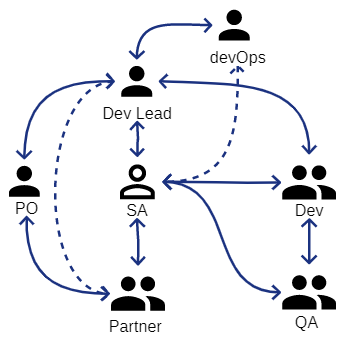
ตัวอย่าง Scrum ที่มี SA ร่วมทีมจากประสบการ์ณผมเจอมา 2 แบบซึ่งคิดว่าก็ลงตัวในระดับนึง

  • แบบแรก SA คือ leader ของทีม
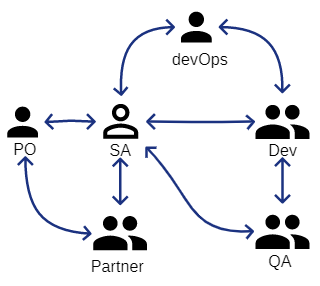
    • ผู้ร่วมทีมจะมี SA, Dev, QA โดยแต่ละทีมจะรับผิดชอบ Feature นั้นๆ ทั้งหมด Cover ทั้ง Frontend และ Backend มี SA ทำหน้าที่เป็น Leader ทำงานใกล้ชิดกับ PO เพื่อสรุป Story เข้า Sprint เมื่อได้รายละเอียดเพียงพอที่จะเอามาทำแล้วก็จะให้ทีม vote point ตอน planing อีกทีว่ารับงานได้แค่ไหน ในช่วงเวลาที่ start sprint SA ก็จะมีหน้าที่ประสานงานและเตรียมในสิ่งที่ต้องใช้ในงาน sprint ร่วมถึงวางแผ่น design งานใน backlog ที่จะเอาเข้ามาทำในรอบต่อไป หน้าที่อีกอย่างคือสรุปงานและเตรียมของรวมถึงแผน rollback สำหรับ deploy งานขึ้น production
    • SA ในทีมรูปแบบนี้จำเป็นที่จะต้องผ่านการ coding มาก่อนและควรมีความเป็น Senior เนื่องจากทีหน้าที่เป็นผู้นำของทีมและมีความรับผิดชอบทั้งในส่วน design และประสานงาน

sa skill

  • แบบสอง SA ทำหน้าที่ Platform/Feature integration
    • ผู้ร่วมทีมจะมี SA, Dev Lead, Dev, QA โดยที่แต่ละทีมจะทำ Product เดียวกันแต่แบ่งทีมเป็นทีม Frontend และ Backend ทีมที่รับผิดชอบ Frontend จะดูแลในส่วน Feature ส่วนทีมที่รับผิดชอบ Backend จะดูแลในส่วน Platform SA ทำงานใกล้ชิดกับ PO และ Dev Lead เพื่อสรุป Story เข้า Sprint เมื่อได้รายละเอียดเพียงพอถึงเอางานเข้า planing
    • หน้าที่ในระหว่าง sprint ระหว่าง Frontend และ Backend ก็ต่างกัน
      • Frontend ในช่วง start sprint จะมีหน้าที่ค่อย support team ในเรื่องของ flow และ data ที่จะต้อง integrate กับทีมต่างๆ และจะต้องสรุป flow ของ feature ต่อไปที่อยู่ใน backlog เพื่อจะได้เอาเข้ามาทำใน next sprint ได้
      • Backend ในช่วง start sprint จะมีหน้าที่ค่อย support team ในเรื่อง spec ของ API ที่จะต้องทำและจะต้อง design API ต่อไปที่อยู่ใน backlog ที่ PO ต้องการให้ทำเพิ่มเพื่อ support frontend หรือ partner ที่จะมาเรียกใช้งาน
    • จะเห็นว่า SA ในรูปแบบการทำงานทีม Frontend ไม่จำเป็นต้องมีทักษะ Coding ก็ได้เนื่องจากจะดูในส่วนของ Flow และมี Dev lead ค่อยให้คำปรึกษา แต่ในส่วนของ Backend ควรจะมีทักษะ Coding อยู่บางเนื่องจากต้อง design API ขึ้นมาถึงแม้จะมี Dev lead ให้ปรึกษาแต่ถ้าไม่มีทักษะ Coding จะทำให้เวลาพูดคุยกันเข้าใจไม่ตรงกันได้

sa skill

  • จะเห็นว่าทั้ง 2 รูปแบบนั้น SA จะทำงานใกล้ชิดและต้องมีส่วนร่วมในการ Design, Integrate และ Communicate อยู่ทั้งคู่การที่ skill coding หรือผ่านการ coding มาก่อนจะช่วยเสริมในส่วนนี้มากๆ หากไม่มีหรือไม่ผ่านมาเลยก็ใช่ว่าจะทำงานไม่ได้ แต่อาจจะเป็นอุปสรรคในการทำงานมากทั้งภายในทีมหรือระหว่างทีมมากอยู่เหมือนกันครับ

สรุป

SA ยังจำเป็นต้องมีในทีมหรือไมนั้นขึ้นอยู่กับรูปแบบการทำงานของทีมขององค์กรนั้นแต่ SA จำเป็นที่จะต้องมี Skill coding ติดตัวในยุคนี้ครับ ถือว่าเป็น Skill จำเป็นที่ต้องมีเลยดีกว่า เพราะจะทำให้ SA ได้ทำหน้าที่ของ SA จริงๆ และช่วยทำให้ทีมเป็นสุขครับ

· 2 min read
Khanate L.

แนะนำ Extension ดีๆ สำหรับสาย dev ที่ใช้ vscode ครับ

หลังๆ มานี้โปรแกรม SQL Management Studio เริ่มมีขนาดใหญ่ขึ้นเรื่อยๆ ละ หลังสุดที่ผมเห็นขนาดตัวลงอยู่ที่ 1GB กว่าๆ ซึ่งผมว่ามันใหญ่มากกกกก

ผมเลยรองหา Tools อะไรสักตัวที่ไม่ใหญ่มาก และสามารถทำงานกับ MSSQL พื้นฐานได้ครบ (SELECT , INSERT , UPDATE , DELETE , Call Function/Stored Procedure) แล้วผมก็เจอ Extension บน VSCODE ซึ้งทำงานได้ OK เลยทีเดียว

1.แน่นอนต้องมี VSCODE ก่อนเลย

วิธีติดต่อก็ตามนี้เลยครับ ไปที่เมนู Extension เลยครับ แล้วพิมพ์ชื่อ “mssql”

install-extension

info

หรือสามารถ Instrall ผ่าน vscode market place ได้ที่นี

2. Change Language ของ File เราให้เป็น SQL ซะก่อน

1. พิมพ์ Ctrl + P พิมพ์ Change Language Mode แล้ว Enter

change-language

2. พิมพ์ sql แล้ว Enter

change-language-sql

3. กำหนด connection ครับ

Ctrl+P แล้วพิมพ์ mssql แล้ว Enter

  • ขั้นแรกเรายังไม่เคยสร้าง connection ไว้ จะแสดงให้เรา create profile ครับ Enter ที่ Create Connection Profile แล้ว Enter

  • กำหนด Hostname หรือ Server Database ที่จะ Connect แล้ว Enter

  • กำหนดชื่อ Database แล้ว Enter

  • กำหนดรูปแบบการ Authentication แล้ว Enter

  • กำหนด Username สำหรับ Connect แล้ว Enter

  • กำหนด Password สำหรับ Connect แล้ว Enter

  • กำหนดว่าให้จำ Password เราไว้หรือไม แล้ว Enter

  • กำหนดชื่อ Profile นี้ แล้ว Enter

  • เมื่อกำหนดครบแล้วจะแสดงข้อความแบบนี้แสดงว่า Create และ Connect เรียบร้อย

สังเกตุ taskbar ด้านล่างจะแสดงการ connect ของเราตามที่เรากำหนด

4. Create Profile และ Connect เรียบร้อยพร้อมใช้งาน

วิธีการใช้งานก็ไม่ยุ่งยากครับ

1. พิมพ์คำสั่ง SQL เลยครับ

สังเกตุเห็นอะไรไมครับ มี intellisense แสดง Table กับ Column ด้วยครับ !!! เจ๋งมาก

2. พิมพ์เสร็จแล้วเวลา Execute กด Ctrl+P พิมพ์ mssql เลือก Execute Query หรือ Ctrl + Shift + E

3. แสดงผลลัพธ์เป็น Grid และ Message

info

Tip เจ๋งๆ ครับ ที่ผมชอบมาก

Extension ตัวนี้สามารถ Export Result ที่ได้ออกมาได้เป็น Format Excel, CSV และ JSON ครับ ด้วยวิธีง่ายๆ เลยครับ แค่คลิกขวา เลือก Format ที่ต้องการ

แค่นี้เองครับง่ายๆ เจ๋งมาก!!!

โดยสามารถเลือกเฉพาะ Column

หรือหลายๆ Column ตามที่ต้องการได้เลย

จบแล้วครับ ขอบคุณครับ

Ref : https://docs.microsoft.com/en-us/sql/linux/sql-server-linux-develop-use-vscode

· 13 min read
Khanate L.

แนวทางของ Dev เป็ดๆ แปลงจาก Swagger เป็น Excel

ทำไมต้องทำ

เนื่องจากมีงานที่ต้องทำแต่ API เพียวๆ แล้วเจ้าตัว Swagger ไม่ตอบโจทย์ที่ลูกค้าต้องการ เลยเป็นประเด็นให้เกิด Blog นี้ สำหรับใครที่ไม่รู้จักเจ้า Swagger ก็รองศึกษาดูจาก Swagger

Swagger เรียกๆ ง่ายๆ ก็คือตัวช่วยตัวนึงที่ช่วยให้ API ที่เราทำมีหน้าสำหรับทดสอบและอธิบายแทน Document โดยที่เราไม่ต้องเขียนเอง ช่วยงาน Developer ด้วยกันได้ดีมากๆ (ฟังดูก็ครบถ้วนนิ หึหึ)

เหตุผลหลักๆ ที่ไม่ตอบโจทย์ตามต้องการมีดังนี้

  1. เอกสารอยู่ในรูปแบบของ html เวลาเปิดดูแล้วเหมือนจะสะดวก แต่ถ้าเราต้องดู Schema ควบคู่ไปด้วยจะได้ Scroll mouse ไปๆ มาๆ
  2. เนื่องเอกสารที่ Swagger ทำให้สุดท้ายจะเป็นรูปแบบ html ทำให้เวลาแก้ไขเพิ่มเติมไม่สะดวก
  3. การพิมพ์อธิบาย Condition ต่างๆ ยาวๆ ทำได้ไม่สะดวก
  4. หลายๆ องค์กรยังคงต้องการเอกสารส่งงานที่ดูเป็นทางการอย่าง Word, Excel อยู่

ด้วยเหตุผลด้านบน(เจอมากับตัว) ทำให้ต้องมาทำเอกสารเหมือนเดิม แต่เราไม่อยากเสียเวลาต้องทำใหม่ทั้งหมดเพราะเรามีเจ้า Swagger ทำมาให้เยอะแล้วนิ เลยหาวิธี Convert จากเจ้า Swagger มาเป็น เอกสารอย่าง Word หรือ Excel ให้ได้ดีกว่า

หากท่านใดเจอเครื่องมือที่ดีอยู่แล้วหรือมีวิธีที่ดีกว่าวิธีที่ผมจะอธิบายด้านล่างนี้รบกวนแจ้งให้ทราบด้วยครับ เนื่องจากผมพยายามหาอยู่นานแต่ไม่พบเลยตัดสินใจ เขียนมันเองซะเลย

เจ้า Swagger เนี่ย นอกจากสร้างหน้า Web ให้เราใช้งานง่ายแล้ว แต่มันยังมีเป็นรูปแบบ JSON ให้เรานำไปใช้งานได้ด้วย มี Document อธิยายโครงสร้างชัดเจน ตัวนี้ละที่ช่วยเราได้

อธิบาย JSON Structure แบบสรุปคราวๆ ก่อน

Root ของ JSON จะเป็นดังนี้ สิ่งที่เราสนใจจริงๆ คือ paths และ definitions โดยที่ paths : เป็นรายการของ API และมี Parameter Request/Response บางส่วนที่ไม่ซับซ้อน definitions : เป็น Schema หรือ Model ของ Parameter Request/Response แบบซับซ้อน

เข้าไปดูที่ paths สิ่งที่เราสนใจจะมีอยู่หลาย Parameter เหมือนกัน โดยส่วนที่ซับซ้อนจะเป็นส่วนของ schema เพราะจะเป็นส่วนที่อ้างถึง Schema ที่อยู่ใน definitions ทำให้เราต้องเขียนข้อมูลไปหา Schema ที่ต้องการในนั้นต่อ

เข้าไปดูที่ definitions จะเป็นรายการของ Schema ทั้งหมด โดยส่วนที่ซับซ้อนจะเป็นส่วนที่เรียกหา definitions เองอีกครั้ง ทำให้ในการเขียน Logic เราควรเขียนให้เป็น Recursive

ดู Document ที่อธิบาย JSON structure เพิ่มได้ที่ Swagger JSON Specification

เริ่มทำเครื่องมือ

ผมจะทำเครื่องมือที่ Convert Swagger JSON ให้ออกมาเป็น Excel API Spec แบบ Simple แต่มี Column ครบพร้อมให้นำไปเขียนหรือแก้ไขเพิ่มได้เลย โดยหน้าตา Excel ที่ได้จะเป็นดังนี้ มี Sheet index ที่รวมรายชื่อของ API ทั้งหมด และใส่สูตร Formula ให้ Click ไปที่ Sheet นั้นได้เลย

มี Column ครบตามที่ API Spec ควรจะมี บอกลำดับชั้นของ Parameter และมี Link Click กลับมา Sheet Index

หากเราเข้าใจ JSON Structure แล้วจะใช้เครื่องมืออะไรทำก็ได้ละ C#, VB, JAVA, Javascript ทางผู้เขียนขอเลือก Javascript ละกัน พอดีกำลังศึกษา Node.js หลักการที่ผมจะทำก็คือจะสร้างตัวแปรเก็บค่าทั้งชื่อ API, Method Type, Description, Request Parameter, Response Parameter ทั้งหมดเก็บไว้ก่อน แล้วค่อยนำไปเขียนสร้างเป็น Excel ออกมาทีเดียว ที่ทำแบบนี้เพื่อให้ง่ายต่อการนำไปใช้ตอนทำ Excel และ Code น่าจะดูสะอาดขึ้น

1. เริ่มแรกก็ npm install package ตัวช่วยก่อน

ที่เลือกใช้มีหลักๆ มี 3 ตัว คือ

  1. excel4node : เพราะเราจะสร้างเป็น excel เลยต้องมีตัวช่วยสร้าง excel ให้เรา
  2. request : สำหรับ request json จาก URL Swagger เลย
  3. request-promise : ตัวช่วยทำ async ของ request
npm install excel4node request request-promise

request กับ request-promise จากเว็บต้นทางแจ้งว่า "This package has been deprecated" แล้วนะครับ ดังนั้นถ้านำไปใช้ใน production น่าจะต้องหา package ที่เทียบเท่ามาใช้งานแทบครับ

2. เขียน request JSON จาก URL Swagger

วิธีดูว่า URL JSON ของ Swagger ของเราคืออะไรดูได้จากหน้า Swagger เองเลยครับ ตามรูป

var rp = require('request-promise');
var swaggerJsonUrl = 'http://xxxxxx:xxxx/xxx/v2/api-docs?group=CustomerMaster';
var json;
var options = {
uri: swaggerJsonUrl,
json: true // Automatically stringifies the body to JSON
};
console.log('Swagger URL : ' + swaggerJsonUrl);
rp(options)
.then(function (parsedBody) {
console.log('Get Url Response');
json = parsedBody;
console.log('Call generateExcel');
generateExcel();
})
.catch(function (err) {
console.log('Error : ' + err);
});

3. สร้าง Class Model สำหรับเก็บ API, Request และ Response

"use strict";
exports.__esModule = true;
var modelService = /** @class */ (function () {
function modelService() {
this.module = '';
this.service = '';
this.methodType = '';
this.description = '';
this.request = [];
this.response = [];
}
return modelService;
}());
exports.modelService = modelService;
var modelRequest = /** @class */ (function () {
function modelRequest() {
this.name = '';
this.paramType = '';
this.type = '';
this.lv = '';
this.description = '';
this.required = '';
this.simpleValue = '';
this.posibleValue = '';
}
return modelRequest;
}());
exports.modelRequest = modelRequest;
var modelResponse = /** @class */ (function () {
function modelResponse() {
this.name = '';
this.paramType = '';
this.type = '';
this.lv = '';
this.description = '';
this.required = '';
this.simpleValue = '';
this.posibleValue = '';
}
return modelResponse;
}());
exports.modelResponse = modelResponse;

4. เตรียม Function ต่างๆ สำหรับเรียกใช้ในส่วน Function หลัก

โดยแยกไว้เป็น Function ย่อยๆ ดังนี้

4.1. Function สำหรับ Recursive หา Parameter ตอน Request

function getDefinitionItemRequest(json ,lvCount, name,paramType) {    
for (var item in json.definitions) {
if (item === name) {
var prop = json.definitions[item];
for (var pName in prop.properties) {
var data = prop.properties[pName];
if (data.$ref) {

var rItem = prop.properties[pName];
pushDataToModelRequest(prop,pName,paramType,rItem.type,lvCount,rItem.description,rItem.required,rItem.example,rItem.enum);

var defineName = getDefineName(data.$ref);
getDefinitionItemRequest(json,(lvCount + 1),defineName,paramType);

} else {
if (data.type == 'object' || data.type == 'array') {
// check has child
for (var cName in data) {
var child = data[cName];
if (IsString(child)) {
if (child.indexOf('#/definitions') !== -1) {

var defineName = getDefineName(data.$ref);
getDefinitionItemRequest(json,(lvCount + 1),defineName,paramType);
}
} else {
for (var c2Name in child) {
var child2 = child[c2Name];
if (!IsString(child2)){

var defineName = getDefineName(child2.$ref);
var rItem = child[c2Name];
pushDataToModelRequest(prop,defineName,paramType,rItem.type,lvCount,rItem.description,rItem.required,rItem.example,rItem.enum);
getDefinitionItemRequest(json,(lvCount + 1),defineName,paramType);

} else if (IsString(child2) && child2.indexOf('#' > -1)) {

var defineName = getDefineName(child2);
var rItem = child[c2Name];
pushDataToModelRequest(prop,pName,paramType,rItem.type,lvCount,rItem.description,rItem.required,rItem.example,rItem.enum);
getDefinitionItemRequest(json,(lvCount + 1),defineName,paramType);
}
}
}
}
} else {
var rItem = prop.properties[pName];
pushDataToModelRequest(prop,pName,paramType,rItem.type,lvCount,rItem.description,rItem.required,rItem.example,rItem.enum);
}
}
}

return listDefineRequest;
}
}
}

4.2. Function สำหรับ Recursive หา Parameter ตอน Response

function getDefinitionItemResponse(json,lvCount,name,paramType) {    
for (var item in json.definitions) {
if (item === name) {
var prop = json.definitions[item];
for (var pName in prop.properties) {

var data = prop.properties[pName];

if (data.$ref) {
var rItem = prop.properties[pName];
pushDataToModelResponse(pName,paramType,rItem.type,lvCount,rItem.description,rItem.required,rItem.example);
var defineName = getDefineName(data.$ref);
getDefinitionItemResponse(json,(lvCount + 1),defineName,paramType);

} else {
if (data.type == 'object' || data.type == 'array') {
// check has child
for (var cName in data) {
var child = data[cName];
if (IsString(child)) {
if (child.indexOf('#/definitions') !== -1) {
var defineName = getDefineName(data.$ref);
getDefinitionItemResponse(json,(lvCount + 1),defineName,paramType);
}
} else {
for (var c2Name in child) {
var child2 = child[c2Name];
if (!IsString(child2)){

var defineName = getDefineName(child2.$ref);
var rItem = child[c2Name];
pushDataToModelResponse(defineName,paramType,rItem.type,lvCount,rItem.description,rItem.required,rItem.example);
getDefinitionItemResponse(json,(lvCount + 1),defineName,paramType);

} else if (IsString(child2) && child2.indexOf('#' > -1)) {

var defineName = getDefineName(child2);
var rItem = child[c2Name];
pushDataToModelResponse(pName,paramType,rItem.type,lvCount,rItem.description,rItem.required,rItem.example);
getDefinitionItemResponse(json,(lvCount + 1),defineName,paramType);
}
}
}
}
} else {
var rItem = prop.properties[pName];
pushDataToModelResponse(pName,paramType,rItem.type,lvCount,rItem.description,rItem.required,rItem.example);
}
}
}

return listDefineResponse;
}
}
}

4.3. Function สำหรับตรวจสอบว่า Parameter ตัวนี้เป็น Require Filed หรือเปล่าตอน Request

function checkDefinitionRequestIsRequired(requestItem,requestName) {
if (!requestItem.required) {
return false;
}
for (var reqName in requestItem) {
var reqItem = requestItem.required[reqName];
if (reqItem === requestName) {
return true;
}
}
return false;
}

4.4. Function สำหรับตรวจสอบ Data type ว่าเป็น String หรือไม

function IsString(obj) {
return obj !== undefined && obj != null && obj.toLowerCase !== undefined;
}

4.5. Function สำหรับหาชื่อ Define เพื่อ Recursive

function getDefineName(valueRefStr) {
var ref = valueRefStr;
var tmp = ref.split('/');
var defineName = tmp[tmp.length - 1];
return defineName;
}

4.6. Function สำหรับ Set ค่า Request สำหรับนำไปสร้าง Excel

function pushDataToModelRequest(jsonPopDefineList,paramName,paramType,dataType,paramLv,paramDesc,paramRequired,paramSimpleValue,paramPosible) {
var requestModel = new modelService.modelRequest();
requestModel.name = paramName;
requestModel.paramType = paramType;
requestModel.type = dataType;
requestModel.lv = paramLv;
if (paramDesc) {
requestModel.description = paramDesc;
} else {
requestModel.description = '';
}
if (paramRequired) {
requestModel.required = paramRequired;
} else {
requestModel.required = checkDefinitionRequestIsRequired(jsonPopDefineList,paramName);
}
requestModel.simpleValue = paramSimpleValue;
var posibleStr = '';
if (paramPosible) {
for (var eName in paramPosible) {
posibleStr += paramPosible[eName] + ',';
}
if (posibleStr != '') {
posibleStr = posibleStr.substr(0,posibleStr.length -1);
}
}
requestModel.posibleValue = posibleStr;
listDefineRequest.push(requestModel);
}

4.7. Function สำหรับ Set ค่า Response สำหรับนำไปสร้าง Excel

function pushDataToModelResponse(paramName,paramType,dataType,paramLv,paramDesc,paramRequired,paramSimpleValue) {
var responseModel = new modelService.modelResponse();
responseModel.name = paramName;
responseModel.paramType = paramType;
responseModel.type = dataType;
responseModel.lv = paramLv;
if (paramDesc) {
responseModel.description = paramDesc;
} else {
responseModel.description = '';
}
if (paramRequired) {
responseModel.required = paramRequired;
}
responseModel.simpleValue = paramSimpleValue;
listDefineResponse.push(responseModel);
}

5. สุดท้าย Function หลักที่ถูกเรียกหลังจาก Request Swagger แล้ว

เพื่อเตรียม data และ generate excel โดยขอแบ่งเป็น 2 ส่วน

5.1. ส่วนทำหน้าที่ Prepare Data

for (var path in json.paths) {

var pathItem = json.paths[path];

for (var method in pathItem) {

var itemMethod = pathItem[method];
// validate
if (!itemMethod) continue;
if (!itemMethod.summary) continue;
if (!itemMethod.operationId) continue;

var moduleName = '';
if (itemMethod.tags) {
moduleName = itemMethod.tags[0];
}

var serviceName = '';
if (itemMethod.operationId) {
serviceName = itemMethod.operationId.replace('/','');
} else {
if (itemMethod.summary) {
serviceName = itemMethod.summary.replace('/','');
}
}

var serviceDesc = '';
if (itemMethod.description) {
serviceDesc = itemMethod.description;
}

// validate for some module or service you want to not generate
if (skipModuleForGenerate.indexOf(moduleName) > -1) continue;
if (skipServiceForGenerate.indexOf(serviceName) > -1) continue;

var serviceModel = new modelService.modelService();
console.log('module : ' + moduleName);
serviceModel.module = moduleName;
console.log('service : ' + serviceName);
serviceModel.service = serviceName;
serviceModel.description = serviceDesc;
serviceModel.methodType = method;
var param;
var name;
var paramType;
var type;
var desc;
var required;
/* Prepare Request */
listDefineRequest = [];
for (var paramName in itemMethod.parameters) {
param = itemMethod.parameters[paramName];
name = param.name;
paramType = param.in;
type = param.type;
desc = param.description;
required = false;
if (param.required) {
required = true;
}
if (param.schema) {

if (param.schema.$ref) {
var define = getDefineName(param.schema.$ref);
var definition = getDefinitionItemRequest(json,1,define,paramType);
for (var i in definition) {
serviceModel.request.push(definition[i]);
}
listDefineRequest = [];

} else if (param.schema.items.$ref) {
var define = getDefineName(param.schema.items.$ref);
var definition = getDefinitionItemRequest(json,1,define,paramType);
for (var i in definition) {
serviceModel.request.push(definition[i]);
}
listDefineRequest = [];

} else {
var define = param.schema.description;
var definition = getDefinitionItemRequest(json,1,define,paramType);
for (var i in definition) {
serviceModel.request.push(definition[i]);
}
listDefineRequest = [];
}

} else {
// LV 1
var requestModel = new modelService.modelRequest();
requestModel.name = name;
requestModel.paramType = paramType;
requestModel.type = type;
requestModel.lv = '1';
requestModel.description = desc;
requestModel.required = required;
requestModel.simpleValue = '';
serviceModel.request.push(requestModel);
}
}

/* Prepare Response */
listDefineResponse = [];
for (var paramName in itemMethod.responses) {
// filter for response success
if (paramName != 200) continue;

param = itemMethod.responses[paramName];
name = param.name;
paramType = 'body';
type = param.type;
desc = param.description;
required = false;
if (param.required) {
required = true;
}
if (param.schema) {
// LV x => for model response multi level
if (param.schema.$ref) {
var define = getDefineName(param.schema.$ref);
var definition = getDefinitionItemResponse(json,1,define,paramType);
for (var i in definition) {
serviceModel.response.push(definition[i]);
}
listDefineResponse = [];
} else if (param.schema.items.$ref) {

var define = getDefineName(param.schema.items.$ref);
var definition = getDefinitionItemResponse(json,1,define,paramType);
for (var i in definition) {
serviceModel.response.push(definition[i]);
}
listDefineResponse = [];
} else {

var define = param.schema.description;
var definition = getDefinitionItemResponse(json,1,define,paramType);
for (var i in definition) {
serviceModel.response.push(definition[i]);
}
listDefineResponse = [];
}

} else {
// LV 1 => for model response single level
var responseModel = new modelService.modelService();
responseModel.name = name;
responseModel.paramType = paramType;
responseModel.type = type;
responseModel.lv = '1';
responseModel.description = desc;
responseModel.required = required;
responseModel.simpleValue = '';
serviceModel.response.push(responseModel);
}
}

serviceList.push(serviceModel);
}
}

5.2. ส่วนที่ทำหน้าสร้าง Excel ในส่วนนี้ขอแบ่งเป็น 3 ส่วน

5.2.1. ส่วนกำหนด Style ของ Cell

// 1. style for table header
var tHeadStyle = wb.createStyle({
font: {
color: '#FFFFFF',
},
border: {
left: {
style: 'thin', //§18.18.3 ST_BorderStyle (Border Line Styles) ['none', 'thin', 'medium', 'dashed', 'dotted', 'thick', 'double', 'hair', 'mediumDashed', 'dashDot', 'mediumDashDot', 'dashDotDot', 'mediumDashDotDot', 'slantDashDot']
color: '#000000' // HTML style hex value
},
right: {
style: 'thin',
color: '#000000'
},
top: {
style: 'thin',
color: '#000000'
},
bottom: {
style: 'thin',
color: '#000000'
}
},
fill:{
type: 'pattern', // Currently only 'pattern' is implemented. Non-implemented option is 'gradient'
patternType: 'solid', //§18.18.55 ST_PatternType (Pattern Type)
bgColor: '#000000', // HTML style hex value. defaults to black
fgColor: '#000000' // HTML style hex value. defaults to black.
}
});
// 2. style for table body cell with indent
var cellIndentStyle = wb.createStyle({
alignment:{
indent:1
}
});
// 3. style for table body cell
var cellBorderStyle = wb.createStyle({
border: { // §18.8.4 border (Border)
left: {
style: 'thin', //§18.18.3 ST_BorderStyle (Border Line Styles) ['none', 'thin', 'medium', 'dashed', 'dotted', 'thick', 'double', 'hair', 'mediumDashed', 'dashDot', 'mediumDashDot', 'dashDotDot', 'mediumDashDotDot', 'slantDashDot']
color: '#000000' // HTML style hex value
},
right: {
style: 'thin',
color: '#000000'
},
top: {
style: 'thin',
color: '#000000'
},
bottom: {
style: 'thin',
color: '#000000'
},
diagonal: {
style: 'thin',
color: '#000000'
},
diagonalDown: true,
diagonalUp: true,
outline: true
}
});

5.2.2. ส่วนสำหรับสร้าง Sheet Index

// start loop set table body of sheet index
for (let i = 0;i < index.length; i++) { var obj = index[i]; ws.cell(row, 1).number(row -1); ws.cell(row, 1).style(cellBorderStyle); ws.cell(row, 2).string(obj.module); ws.cell(row, 2).style(cellBorderStyle); ws.cell(row, 3).string(obj.service); ws.cell(row, 3).style(cellBorderStyle); var serviceName = obj.service; // for protect limit sheet name of excel if (serviceName.length > 30) {
serviceName = serviceName.substring(0,30);
}

// for link goto sheet service
ws.cell(row, 4).formula('=HYPERLINK("#' + serviceName + '!A1","' + obj.service + '")');
ws.cell(row, 4).style(cellBorderStyle);
row++;
}

5.2.3. ส่วนสำหรับสร้าง Sheet API Specification และ Save ออกมาเป็น Excel File

/* create excel specification follow api */
for (let service in serviceList) {

console.log('module : ' + serviceList[service].module + ' / service : ' + serviceList[service].service);
var row = 1;
var serviceName = serviceList[service].service;

// for protect limit sheet name of excel
if (serviceName.length > 30) {
serviceName = serviceName.substring(0,30);
}

// create new sheet
var ws = wb.addWorksheet(serviceName);

ws.cell(row, 1,row,3,true).string('Module : ' + serviceList[service].module);

// for back to index sheet
ws.cell(row, 11).formula('=HYPERLINK("#index!A1","Back to index")');

row++;
ws.cell(row, 1,row,3,true).string('Service Name : ' + serviceList[service].service);
row++;
ws.cell(row, 1,row,3,true).string('Method Type : ' + serviceList[service].methodType);
row++;
ws.cell(row, 1,row,3,true).string('Description : ' + serviceList[service].description);
row++;

var count = 1;
// set table header of request parameter
ws.cell(row, 1).string('Request');
row++;
ws.cell(row, 1).string('Parameter');
ws.cell(row,1).style(tHeadStyle);
ws.cell(row, 2).string('Parameter Type');
ws.cell(row,2).style(tHeadStyle);
ws.cell(row, 3).string('Level');
ws.cell(row,3).style(tHeadStyle);
ws.cell(row, 4).string('Data Type');
ws.cell(row,4).style(tHeadStyle);
ws.cell(row, 5).string('Length');
ws.cell(row,5).style(tHeadStyle);
ws.cell(row, 6).string('O/M');
ws.cell(row,6).style(tHeadStyle);
ws.cell(row, 7).string('Description');
ws.cell(row,7).style(tHeadStyle);
ws.cell(row, 8).string('Simple Value');
ws.cell(row,8).style(tHeadStyle);
ws.cell(row, 9).string('Possible Value');
ws.cell(row,9).style(tHeadStyle);
ws.cell(row, 10).string('Formula/Remark');
ws.cell(row,10).style(tHeadStyle);
row++;

// start table body of request parameter
for (let req in serviceList[service].request) {

var item = serviceList[service].request[req];

// Column Parameter
if (item.name) {
ws.cell(row, 1).string(item.name);
} else {
ws.cell(row, 1).string('');
}
// check level of parameter for use style
if (item.lv) {
if (Number(item.lv) > 1){
cellIndentStyle.alignment.indent = Number(item.lv) - 1;
ws.cell(row, 1).style(cellIndentStyle);
}
}
ws.cell(row, 1).style(cellBorderStyle);

// Column Parameter Type (header , body)
if (item.paramType) {
ws.cell(row, 2).string(item.paramType);
} else {
ws.cell(row, 2).string('');
}
ws.cell(row, 2).style(cellBorderStyle);

// Column Parameter Level
if (item.lv) {
ws.cell(row, 3).number(Number(item.lv));
} else {
ws.cell(row, 3).number(0);
}
ws.cell(row, 3).style(cellBorderStyle);

// Column Type (string , integer , ....)
if (item.type) {
ws.cell(row, 4).string(item.type);
} else {
ws.cell(row, 4).string('');
}
ws.cell(row, 4).style(cellBorderStyle);

// Column Length for other condition or mapping db column size
ws.cell(row, 5).style(cellBorderStyle);

// Column O/M (optional , mandatory)
if (item.required) {
ws.cell(row, 6).string('M');
} else {
ws.cell(row, 6).string('O');
}
ws.cell(row, 6).style(cellBorderStyle);

// Column Description
if (item.description) {
ws.cell(row, 7).string(item.description);
} else {
ws.cell(row, 7).string('');
}
ws.cell(row, 7).style(cellBorderStyle);

// Column Simple value
if (item.simpleValue) {
ws.cell(row, 8).string(item.simpleValue.toString());
} else {
ws.cell(row, 8).string('');
}
ws.cell(row, 8).style(cellBorderStyle);

// Column Possible Value not include in swagger
if (item.posibleValue) {
ws.cell(row, 9).string(item.posibleValue);
} else {
ws.cell(row, 9).string('');
}
ws.cell(row, 9).style(cellBorderStyle);

// Column Formula/Remark not include in swagger
ws.cell(row, 10).style(cellBorderStyle);
count ++;
row++;
}
row++;

// set table header of response parameter
ws.cell(row, 1).string('Response');
row++;
ws.cell(row, 1).string('Parameter');
ws.cell(row,1).style(tHeadStyle);
ws.cell(row, 2).string('Parameter Type');
ws.cell(row,2).style(tHeadStyle);
ws.cell(row, 3).string('Level');
ws.cell(row,3).style(tHeadStyle);
ws.cell(row, 4).string('Data Type');
ws.cell(row,4).style(tHeadStyle);
ws.cell(row, 5).string('Length');
ws.cell(row,5).style(tHeadStyle);
ws.cell(row, 6).string('O/M');
ws.cell(row,6).style(tHeadStyle);
ws.cell(row, 7).string('Description');
ws.cell(row,7).style(tHeadStyle);
ws.cell(row, 8).string('Simple Value');
ws.cell(row,8).style(tHeadStyle);
ws.cell(row, 9).string('Possible Value');
ws.cell(row,9).style(tHeadStyle);
ws.cell(row, 10).string('Formula/Remark');
ws.cell(row,10).style(tHeadStyle);
row++;

// start table body of response parameter
for (let res in serviceList[service].response) {

var item = serviceList[service].response[res];

// Column Parameter Name
if (item.name) {
ws.cell(row, 1).string(item.name);
} else {
ws.cell(row, 1).string('');
}
// check level of parameter for use style
if (item.lv) {
if (Number(item.lv) > 1){
cellIndentStyle.alignment.indent = Number(item.lv) - 1;
ws.cell(row, 1).style(cellIndentStyle);
}
}
ws.cell(row, 1).style(cellBorderStyle);

// Column Parameter Type (header,body)
if (item.paramType) {
ws.cell(row, 2).string(item.paramType);
} else {
ws.cell(row, 2).string('');
}
ws.cell(row, 2).style(cellBorderStyle);

// Column Parameter Level
if (item.lv) {
ws.cell(row, 3).number(Number(item.lv));
} else {
ws.cell(row, 3).number(0);
}
ws.cell(row, 3).style(cellBorderStyle);

// Column Type (string , integer , ....)
if (item.type) {
ws.cell(row, 4).string(item.type);
} else {
ws.cell(row, 4).string('');
}
ws.cell(row, 4).style(cellBorderStyle);

// Column Length for other condition or mapping db column size
ws.cell(row, 5).style(cellBorderStyle);

// Column O/M (optional , mandatory)
if (item.required) {
ws.cell(row, 6).string('M');
} else {
ws.cell(row, 6).string('O');
}
ws.cell(row, 6).style(cellBorderStyle);

// Column Description
if (item.description) {
ws.cell(row, 7).string(item.description);
} else {
ws.cell(row, 7).string('');
}
ws.cell(row, 7).style(cellBorderStyle);

// Column Simple Value
if (item.simpleValue) {
ws.cell(row, 8).string(item.simpleValue.toString());
} else {
ws.cell(row, 8).string('');
}
ws.cell(row, 8).style(cellBorderStyle);

// Column Possible Value not include in swagger
ws.cell(row, 9).style(cellBorderStyle);

// Column Formula/Remark not include in swagger
ws.cell(row, 10).style(cellBorderStyle);
count ++;
row++;
}
}

// save excel file
wb.write(excelFileName, function (err, stats) {
if (err) {
console.error(err);
} else {
console.log(stats); // Prints out an instance of a node.js fs.Stats object
}
});

คาดว่าบทความนี้จะช่วยบางท่านได้ไม่มากก็น้อย ขอบคุณครับ

info

Download ตัวอย่าง Output Excel ที่ได้จาก Output Excel Download Source Code ทั้งหมดได้ที่ github

· One min read
Khanate L.

พอดีเพิ่งเริมได้เล่น Cloud แบบจริงๆ จังๆ ก็เลยเลือกใช้ของ DigitalOcean เนื่องจากถูกมาก ^^ และหาข้อมูลใช้งานง่าย ที่ต้องทำ Remote Access นั้นเนื่องจากหลังจากสร้าง Droplets (เลือก Ubuntu) แล้วเวลาใช้งานต้องทำงานผ่าน Command เท่านั้นซึ่งไม่สะดวกเลย ก็เลยหาวิธีใช้งานให้ง่ายเวลาจะเข้าไปจัดการกับ Database โอเคเริ่มเลย ก็เปิด putty แล้วก็ shell command กันเลย

ติดตั้ง MySQL

1. เข้ามาแล้วก็ update กันก่อน

$ sudo apt-get update 

2. ติดตั้ง MySQL

sudo apt-get install mysql-server

3. Configuration MySQL และ Set Password

sudo mysql_secure_installation

4. Active MySQL

sudo mysql_install_db

5. ทดสอบ MySQL ด้วย

service mysql status

Enable Remote Access MySQL

การ Enable Remote Access MySQL ทำเพื่อให้เราสามารถ Connect จากโปรแกรมบนเครื่องเราได้ พิมพ์คำสั่ง เพื่อเข้าไปแก้ไข config

sudo vi /etc/mysql/my.cnf

comment 2 บรรทัดนี้

#bind-address = 127.0.0.1
#skip-external-locking

จากนั้น Restart MySQL ด้วยคำสั่ง

sudo service mysql restart

ทำการ Connect MySQL ด้วยคำสั่ง

mysql –u root -p
ระบุ Password ที่เราได้กำหนดไว้ตอน Configuration

ทำการ Grant permission ให้ User root

GRANT ALL PRIVILEGES ON *.* TO root@'%' IDENTIFIED BY 'YOUR_PASSWORD';
FLUSH PRIVILEGES;

ทดสอบเปิดโปรแกรม Connect MySQL บนเครื่อง

กำหนด IP เป็น IP ของ DigitalOcean ที่ได้ กำหนด User เป็น root และ Password ตามที่กำหนดไว้ แล้วกด Open

1

แสดง Popup จากเตือน ว่าเราไม่ได้ใช้ SSL กด OK

2

แสดง Default Database เรียบร้อย พร้อมใช้งาน

3

ขอบคุณครับ